The Gauntlet
The Gauntlet is a challenge added in The Reheated Update. In this challenge, the player starts as ![]() Isaac with 3 coins and no items or bombs. While the goal is displayed as
Isaac with 3 coins and no items or bombs. While the goal is displayed as ![]() Mom, the entire challenge instead takes place over various sections in a single custom-made stage, and the true goal is to defeat every unique boss and mini-boss featured in Fiend Folio (excluding
Mom, the entire challenge instead takes place over various sections in a single custom-made stage, and the true goal is to defeat every unique boss and mini-boss featured in Fiend Folio (excluding ![]() Hermit). Upon defeating
Hermit). Upon defeating ![]() Gravedigger, the final boss of The Gauntlet, a cake resembling
Gravedigger, the final boss of The Gauntlet, a cake resembling ![]() Fiend will appear instead of a trophy, and picking it up will complete the challenge.
Fiend will appear instead of a trophy, and picking it up will complete the challenge.
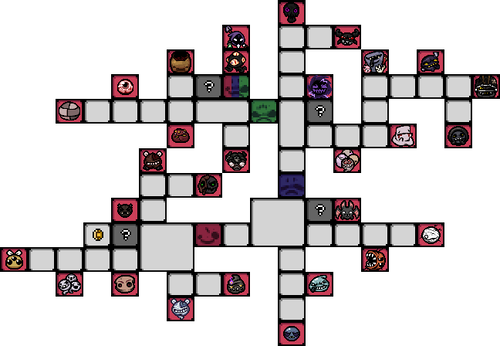
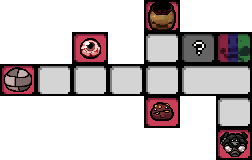
Each section of the challenge features a hub area where collectibles and other consumables can be purchased, and the way to progress past each stage is blocked by a number of Colored Locks. Each boss is encountered in their own arena which branches off the main hub, and defeating one of these bosses will drop 7 ![]() Pennies and a Colored Puzzle Key. Earning money and progressing past each section will require defeating every single boss that can be encountered in each section.
Pennies and a Colored Puzzle Key. Earning money and progressing past each section will require defeating every single boss that can be encountered in each section.
Upon entering a new section, the door leading to the previous section will be sealed, making everything in those sections inaccessible.
Areas
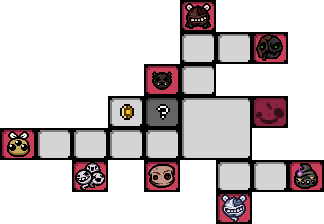
Section 1
Features all Fiend Folio bosses that can be found in Chapter 1 and Chapter 1.5, including:
The items which can be purchased from the shop within the main hub are:
 Red Heart - 3 cents
 Double Heart - 5 cents
 Bone Heart - 5 cents
 VI - The Lovers - 5 cents
 Perfection - 5 cents
 Key - 5 cents
 Sharp Plug - 5 cents
 Demon Baby - 5 cents
 The Small Rock - 15 cents
 Odd Mushroom (Large) - 15 cents
 Epiphora - 15 cents
 Money = Power - 15 cents
 Guppy's Hair Ball - 15 cents
 Spoon Bender - 15 cents
 Tinytoma - 15 cents
 Whore of Babylon - 15 cents
 Aries - 15 cents
 Prayer Card - 15 cents
Other enemies encountered in this section are:
 Horf
Horf Snagger
 Skuzz ×3
 Shirk
Shirk Zingling
 Beeter ×2
 Spitroast
 Smogger
 Mr. Flare
 Commission ×2
 Mullikaboom
 Powderkeg
 Yawner
 Deathany
 Drip ×2
 Shitty Horf
 Connipshit
This section also features a locked door to a ![]() Shop room, adjacent to the room between
Shop room, adjacent to the room between ![]() Buck and
Buck and ![]() The Whispers. Opening it with a
The Whispers. Opening it with a ![]() Key will have the room contain two
Key will have the room contain two ![]() Pennies and a
Pennies and a ![]() Dad's Key for sale that costs 7 cents. It can be used to open the hidden
Dad's Key for sale that costs 7 cents. It can be used to open the hidden ![]() Secret Room of each section.
Secret Room of each section.
The Secret Room of this section, adjacent to ![]() Griddle Horn, contains the following items:
Griddle Horn, contains the following items:
 Bag of Crafting - 15 cents
 Defuse - 5 cents
 White Pepper - 15 cents
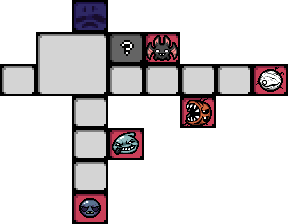
Section 2
Features all Fiend Folio bosses that can be found in Chapter 2, including:
The items that can be purchased from the shop within the main hub are:
 Lil' Battery - 5 cents
 Ace of Hearts - 5 cents
 Double Heart - 5 cents
 Bone Heart - 5 cents
 Tough Love - 15 cents
 Guppy's Head - 15 cents
 Milk! - 15 cents
 Black Powder - 15 cents
 Wooden Spoon - 15 cents
 Greed's Gullet - 15 cents
 Abyss - 15 cents
 Marked - 15 cents
 The Necronomicon - 15 cents
 Dead Bird - 15 cents
 Little Steven - 15 cents
 Lost Contact - 15 cents
Other enemies encountered in this section are:
 Wobbles
 Centipede
 Milk Tooth
 Fat Bat
 Weaver
 Weaver Sr. (Waiting)
 Sackboy
 Level 2 Spider (Waiting) ×2
 Nimbus ×2
 Drop
Drop Dribble
 Aquabab ×2
 Cistern
The Secret Room of this section, adjacent to ![]() Battie, requires the
Battie, requires the ![]() Mystery Badge,
Mystery Badge, ![]() Commissioned Badge, and
Commissioned Badge, and ![]() Spatula Badge in order to be accessed, and contains the following items:
Spatula Badge in order to be accessed, and contains the following items:
 The Fiend Folio - 15 cents
 Flush! - 15 cents
 Red Heart - free
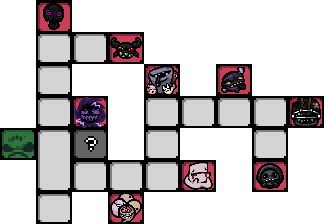
Section 3
Features all Fiend Folio bosses that can be found in Chapter 3 and Chapter 3.5, including:
The items that can be purchased from the shop within the main hub are:
 The Common Cold - 15 cents
 Steven - 15 cents
 Lil Dumpy - 15 cents
 Scapular - 15 cents
 Double Heart - 5 cents
 Bone Heart - 5 cents
 XIX - The Sun - 5 cents
 Cupid's Arrow - 15 cents
 BFFS! - 15 cents
 Technology 2 - 15 cents
 Box of Friends - 15 cents
Other enemies encountered in this section are:
 Cross Stone Shooter
 Patzer
 Gaping Maw ×2
 Banshee
 Brain
Brain Floating Knight
 Guts ×2
 Pale Fatty ×2
 Sternum ×2
 Carrier
 Gary
Gary Squidge
 Furnace
 Slog
Slog Punk
Punk Litter Bug ×2
 Dope's Head
 Grater ×2
 Sewer Pipe ×2
 Sludge Pipe ×2
 Lil Portal
 Nihilist
 Dark Ball ×2
 Madhat
 Ms. Dominator
 Ripcord
The Secret Room of this section, adjacent to ![]() Warp Zone, requires the
Warp Zone, requires the ![]() Baby Badge and
Baby Badge and ![]() Dripping Badge in order to be accessed, and contains the following items:
Dripping Badge in order to be accessed, and contains the following items:
- Pill (guaranteed to be Power Pill!) - 5 cents
 Soul of Lazarus - free
Section 4
Features all Fiend Folio bosses that can be found in Chapter 4 and Chapter 4.5, including:
The items that can be purchased from the shop within the main hub are:
 Blood of the Martyr - 15 cents
 Lil Loki - 15 cents
 Double Heart - 5 cents
 Bone Heart - 5 cents
 Lil' Battery ×2 - 5 cents (each)
 Bomb ×2 - 5 cents (each)
Other enemies encountered in this section are:
 Spicy Dip ×2
 Berry
Berry Nerve Ending ×3
 Astroskull
 Eye
Eye Onlooker ×2
 Peepling
 Nerve Ending 2
 Oralid ×2
 Molly
Molly
The Secret Room of this section, adjacent to the room leading to ![]() The Sun, requires the
The Sun, requires the ![]() Haunted Badge in order to be accessed, and contains only one item:
Haunted Badge in order to be accessed, and contains only one item:
 Chaos Card - 5 cents
Section 5
Features both of Fiend Folio's mini-bosses found in Chapter 5:
Upon defeating Psion, two ![]() Cursed Pennies will spawn instead of normal Pennies. Upon defeating Gravedigger, 4 Cursed Pennies and Fiend's Cake will spawn, and picking up the cake will complete the challenge.
Cursed Pennies will spawn instead of normal Pennies. Upon defeating Gravedigger, 4 Cursed Pennies and Fiend's Cake will spawn, and picking up the cake will complete the challenge.
Notes
- Bosses will never drop hearts on death.
- All rooms, besides the coins and Colored Puzzle Keys from
 Boss Rooms, will never drop rewards on room clear, but will contribute charges to the player's held active item.
  Bag of Crafting, obtained from Section 1's
  Secret Room, can not be used to craft items — attempting to do so will have a message pop up on screen, reading "WHOOPS" / "You look like you dropped something!", and no item will spawn.
 Ace of Hearts, obtained from Section 2's main hub, can not be used in rooms that have not been cleared — effectively making it only usable on the Pennies dropped by bosses.
 Tinted Rocks and
  Fool's Gold Rocks are able to appear in The Gauntlet, but they will not drop anything when destroyed.
Difficulty
- The Gauntlet is effectively a boss rush, requiring the player to defeat every boss featured in Fiend Folio: Reheated.
- Almost all aspects of RNG have been removed or minimized in this challenge — due to the pre-generated layout of the entire stage, and the fact the only way the player can obtain items is by gaining money through defeating bosses in order to buy the hand-picked selection of items in each area, The Gauntlet hinges heavily on the player's skill in order to claim victory.
Strategies
- General advice is to practice against each boss and memorize their patterns — minimizing the amount of damage you take is crucial, as healing is heavily limited and generally costs money which could have otherwise went to buying items that make later fights easier.
- Some tips for individual bosses:
- Bait
 Buck into doing his shoulder charge for an easy shot at damage, and to interrupt the attack where he aims a barrage of bullets at Isaac.
  Honeydrop can be much easier if you have a means to kill the
  Swarm Flies quickly; for instance, having at least 5 damage allows you to kill a Swarm Fly with a single tear.
 Buster's
  Commission may be worth not focusing on, because they can potentially explode on top of Buster when ignited by fire, dealing damage to him.
- If
 Meltdown is about to throw a barrel in his first phase, stay near him to bait him to drop it next to him, so that the explosion deals damage to him when he sets it off.
 - When fighting
 Cacamancer, the player should focus on the
  Cacamancer's Balls and
  Drips he summons, as otherwise Cacamancer can suck them in with his vortex attack and release an increasing number projectiles for each Drip that enters it, which can be especially dangerous.
  Battie can kill her own summons when she runs into them while she's charging across the room.
- Each of
 Kingpin's segments creates a ring of 3 bullets that linger for a few seconds when they die. This can greatly reduce the amount of space Isaac can move around in if he kills Kingpin too quickly.
 - Beware of standing in the corners of the room when fighting
 Aquagob, as they can pop out from under the water at those locations, and Aquagob will do this more often when its HP is low.
 - When
 Warp Zone summons
  Corrupted Contusion and
  Corrupted Suture, the player may want to focus on killing Suture first, as otherwise Suture will gain much more dangerous attacks when Contusion is killed before them.
- Bait
- Some tips for individual bosses:
- There are several different combinations of items that the player can aim for that pair well, here is some notable examples:
 Perfection and the items available in The Gauntlet that are affected by Isaac's luck, such as
  Tough Love, are one of the most powerful pairings, as Tough Love and Perfection will cause Isaac to shoot tooth tears with every shot and greatly boost his DPS — however, this is naturally very risky, as any damage taken while holding Perfection will destroy the trinket.
 Lost Contact is an exceptionally powerful defensive item against bosses that utilize projectiles heavily in their attacks, such as
  Monsoon,
  Warp Zone and
  Cacophobia. When taking Lost Contact, it is recommended to pair it with items that increase Isaac's rate of fire such as
  Epiphora or
  Marked, as the more tears Isaac fires can better replace the tears that are destroyed from colliding with enemy projectiles.
  Technology 2 and
  Cupid's Arrow are also recommended due to their piercing properties, allowing Lost Contact tears to pass through multiple enemy projectiles.
Badge Route
In addition to the regular method of beating The Gauntlet, there are hidden rooms that can be discovered which gives you the ability to purchase extra items which are used to defeat some bosses in a unique manner and collect their badge. Collecting all badges through this route gives you ![]() Your Eternal Reward.
Your Eternal Reward.
Each badge requires killing each of the following bosses using a specific method: ![]() Buck,
Buck, ![]() Buster,
Buster, ![]() Griddle Horn,
Griddle Horn, ![]() Battie,
Battie, ![]() Monsoon,
Monsoon, ![]() The Organization, and
The Organization, and ![]() The Sun. All of the other bosses for each section can be fought in any order, but note that you must remember to gather and save enough money in order to buy each item that is required to get each of the badges.
The Sun. All of the other bosses for each section can be fought in any order, but note that you must remember to gather and save enough money in order to buy each item that is required to get each of the badges.
Section 1
- Once you have at least 47 cents, Go to the main hub and buy a
 Key for 5 cents. Use the key to open the
  Shop room located between the entrances to
  Buck and The Whispers. The Shop room will contain
  Dad's Key for 7 cents; buy it and use it immediately in the Shop to open a
  Secret Room on the right. Purchase
  Bag of Crafting and the
  Defuse card, then go to Buck.
- Fight Buck as you normally would, but make sure to use the Bag of Crafting's swipe to land the killing blow. This will drop the
 Mystery Badge if done correctly.
- Go to
 Buster and fight him normally, and use the Defuse card when he dies and starts to beep. This will cause him to immediately explode and drop the
  Commissioned Badge.
- Go back to the Secret Room and buy
 White Pepper, then go to
  Griddle Horn and use White Pepper on him (making sure to hit him with the flames). This will kill him instantly and have him drop the
  Spatula Badge.
- Once you have all 3 badges and all Key Ghosts in the area, make sure to go back to where you left Dad's Key and take it with you before heading to the next section.
Section 2
- Use Dad's Key in the main hub of the second area to unlock the Secret Room located in the top right corner.
 Kingpin,
  Slinger, and
  Aquagob can be fought as you normally would, making sure to have at least 30 cents left over.
- Go back to the Secret Room and buy
 The Fiend Folio. Go to
  Battie, and use The Fiend Folio on her, which will spawn a friendly Battie that instantly kills the boss when she performs her slam attack. Once the real boss dies, she will drop the
  Baby Badge.
- Go back to the Secret Room again and buy
 Flush!, then go to
  Monsoon and use Flush! while Monsoon is in his small form (the attack where he sends out a pair of
  Dribbles). This will kill him and drop the
  Dripping Badge.
- Once you are done, again make sure to go back to where you left Dad's Key and take it with you before heading to the next area.
Section 3
- Use Dad's Key in the main hub of the third area to unlock the Secret Room located in the top right corner. Buy the
 Pill for 5 cents; this pill will always be a Power Pill!. There will also be a
  Soul of Lazarus available for free; this is not needed to complete the badge route, but is still handy to have.
- Go to
 The Organization, use the Power Pill! and run into Chaser, the ghost with the brain. This will kill all of them and drop the
  Haunted Badge upon killing the final one.
- From this point on, you can now freely purchase items from the main hub, but make sure to save at least 5 coins for the final badge. After you are done, head to the final area, once more making sure to bring Dad's Key.
Section 4
- Use Dad's Key in the main hub of the fourth area to unlock the Secret Room located in the top left corner. Buy the
 Chaos Card and go to
  The Sun. Use the Chaos Card on the main body of The Sun, which will drop the
  Planet Badge once she dies.
- If all the steps have been followed correctly, the
 Your Eternal Reward will appear upon obtaining the final badge, and picking it up will complete the badge route.
Notes
- Obtaining Your Eternal Reward is supposed to give you an achievement, but it is currently not implemented; however, the MOD will remember if all badges have been obtained, so the player will get the unlock when the achievement is eventually added.
- If the player has unlocked Corrupted Data, there is a small chance that items inside the secret rooms will be replaced with
 TMTRAINER items. If this happens, the badge route will become impossible to complete, and the player will have to restart the run to re-attempt it.
Video Showcase
Unlockable Achievements
Stronger Than Golem
A community challenge event was held where players had to beat the entire The Gauntlet challenge in under 20 minutes, with only Fiend Folio enabled. The first five people who beat the challenge were allowed to design their own rock trinket to be included in the MOD. These rocks can appear in runs after obtaining the ![]() Community Achievement achievement from completing The Gauntlet.
Community Achievement achievement from completing The Gauntlet.
The following are the first five people who beat the challenge, proving they were stronger than Golem:
- Alter -
 Lost Artifact
 - Danial -
 Pocket Rock-it
 - Dastarod -
 Ridiculous Metal
 - Gabe -
 Atlas' Burden
 - HoneyFox -
 Wormhole Rock
Trivia
- The Gauntlet is heavily inspired by, and successor to, the Golem's Gauntlet challenge from The Devil's Harvest MOD, which was also a boss rush against all of the MOD's bosses.
- The Stronger Than Golem challenge event is also based directly off of the event of the same name from The Devil's Harvest MOD, as the community event in The Devil's Harvest had a similar premise where players had to beat a certain time on the MOD's Golem's Gauntlet to be allowed to have their own rock trinket added.
| Challenges | |
| Bonus Challenges | |

